C++ IDE Visual Studio Code on Linux


After installing the required tools, there is preferably an IDE for developing the C++ code and building projects.
Have a look at https://code.visualstudio.com/!
The RPM repository is ...
zypper ar "https://packages.microsoft.com/yumrepos/vscode/vscode-yum.repo"
Afterwards zypper in code.
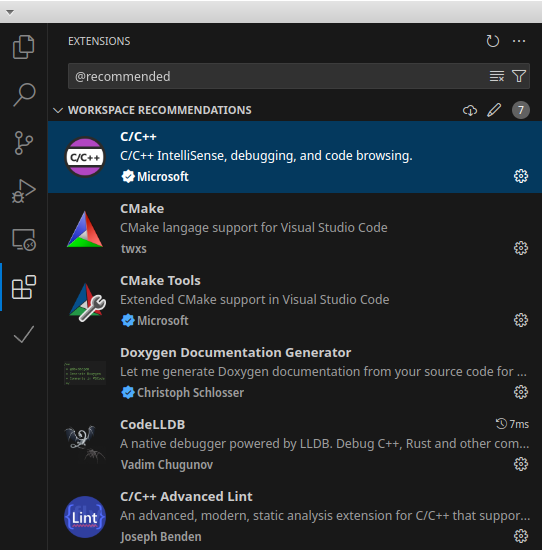
My C++ workspace uses these extensions, which are downloadable for free from the included extension marketplace:
- "ms-vscode.cpptools",
- "jbenden.c-cpp-flylint",
- "akiramiyakoda.cppincludeguard",
- "twxs.cmake",
- "ms-vscode.cmake-tools",
- "cschlosser.doxdocgen",
- "vadimcn.vscode-lldb"
A starting configuration for your C++ workplace might look like my-project.code-workspace:
{
	"folders": [
		{
			"path": "."
		}
	],
	"settings": {
		"c-cpp-flylint.clang.pedantic": true,
		"c-cpp-flylint.cppcheck.executable": "/usr/bin/cppcheck",
		"c-cpp-flylint.cppcheck.extraArgs": [
			"--force",
			"--check-level=normal",
			"--enable=all",
			"--disable=unusedFunction,information",
			"--inline-suppr",
			"--cppcheck-build-dir=${workspaceRoot}/build"
		],
		"c-cpp-flylint.enable": true,
		"c-cpp-flylint.excludeFromWorkspacePaths": [
			"./build",
		],
		"c-cpp-flylint.includePaths": [
			"${workspaceRoot}/include"
		],
		"c-cpp-flylint.standard": [
			"c++23"
		],
		"C_Cpp.autocompleteAddParentheses": true,
		"C_Cpp.inlayHints.autoDeclarationTypes.enabled": true,
		"C_Cpp.inlayHints.autoDeclarationTypes.showOnLeft": true,
		"C_Cpp.inlayHints.parameterNames.enabled": true,
		"C_Cpp.inlayHints.referenceOperator.enabled": true,
		"C_Cpp.codeAnalysis.clangTidy.enabled": true,
		"C_Cpp.files.exclude": {
			"build/**": true,
			"**/.vscode": true,
			"**/.vs": true
		},
		"C_Cpp.codeAnalysis.clangTidy.useBuildPath": true,
		"C_Cpp.default.includePath": [
			"${default}"
		],
		"C_Cpp.default.cppStandard": "c++23",
		"editor.rulers": [
			72,
			80
		],
		"C_Cpp.codeAnalysis.clangTidy.path": "/usr/bin/clang-tidy",
		"C_Cpp.clang_format_path": "/usr/bin/clang-format",
		"C/C++ Include Guard.Macro Type": "Filepath",
		"C/C++ Include Guard.Path Skip": 1,
		"C/C++ Include Guard.Remove Extension": false
	},
	"extensions": {
		"recommendations": [
			"ms-vscode.cpptools",
			"jbenden.c-cpp-flylint",
			"akiramiyakoda.cppincludeguard",
			"twxs.cmake",
			"ms-vscode.cmake-tools",
			"cschlosser.doxdocgen",
			"vadimcn.vscode-lldb"
		]
	},
}
When you have started code and opened the workspace with this file, you have to press the keys Ctrl+Shift+P to open the command prompt and start typing extensions. In the list you'll find something like Extensions: Show Recommended Extensions. Select the entry and the extension sidebar with the recommended extensions will open to the left.
Enable them all for your workspace.
The select the Explorer with Ctrl+Shift+E to see the content of your nearly empty workspace.
Setup CMake Project
Open the command prompt Ctrl+Shift+P and use CMake: Quick Start.
Enter your project name, select C++ Executable project type.
Now in your workspace has been created a build directory which is used for the compiler and linker output. There you'll find later your runnable executable.
From build tool CMake you see the CMakeLists.txt. In it you configure how your project is built.
And a template main.cpp file with the required main()-function.
The provided template is not very C++-ish. It looks like a standard C starter. But this we'll change later.
Config for clang-format
For now open a new text editor with Ctrl+N and copy this content in:
BasedOnStyle: LLVM
AccessModifierOffset: -4
AlignEscapedNewlines: Left
AllowShortFunctionsOnASingleLine: Inline
AllowShortIfStatementsOnASingleLine: Never
BreakBeforeBraces: Attach
ColumnLimit: 80
FixNamespaceComments: false
IndentCaseLabels: false
IndentWidth: 4
NamespaceIndentation: All
ReflowComments: true
SeparateDefinitionBlocks: Always
TabWidth: 4
UseTab: Never
and save the file Ctrl+Shift+S as .clang-format in your top project dir.
Select Modern C++ Compiler
Next step is to select your C++23 compiler. Ctrl+Shift+P and CMake: Scan for Kits and afterwards CMake: Select a Kit.
This needs to be a compiler supporting C++23.
Then edit the CMakeLists.txt for the required C++23 standard to this:
cmake_minimum_required(VERSION 3.0.0)
project(my-project VERSION 0.1.0 LANGUAGES C CXX)

set(CMAKE_CXX_STANDARD 23)
set(CMAKE_CXX_STANDARD_REQUIRED ON)
set(CMAKE_CXX_EXTENSIONS OFF)

set(MY_EXECUTABLE my-project)
add_executable(${MY_EXECUTABLE} main.cpp)
C++ main Function
And drum roll ;-) ... we edit our C++ code in main.cpp:
#include <filesystem>
#include <iostream>
#include <string>
#include <vector>

namespace {
    /// @brief local constant expression with project name
    constexpr const auto k_project_name = "my-project";
}

/// @brief Convert arguments of main entry function to C++ `std` types
///
/// @param argc argument counter
/// @param argv argument vector
///
/// @return `std::pair` with program and `vector` of arguments
///
auto make_cpp_args(const int argc, const char *const argv[])
    -> std::pair<std::string, std::vector<std::string>> {
    auto program = std::filesystem::path(argv[0]).filename().string();

    auto argv_vector = std::vector<std::string>();
    for (auto argc_nr = 1; argc_nr < argc; ++argc_nr) {
        argv_vector.push_back(std::string{argv[argc_nr]});
    }

    return std::pair<std::string, std::vector<std::string>>{program,
                                                            argv_vector};
}

/// @brief Entry main function
///
/// @param argc argument counter
/// @param argv argument vector
///
/// @return program exit code (0 on success)
auto main(const int argc, const char *const argv[]) -> int {
    // Streaming data to stdout with new line at the end
    std::cout << "Hello, from " << k_project_name << "!\n";

    // call the above function `make_cpp_args()`
    const auto [program, args] = make_cpp_args(argc, argv);

    // again some streaming of data values to stdout
    std::cout << "The executable \"" << program << "\" has been called with "
              << args.size() << " arguments.\n";

    // checking for available args and insert another new line
    if (!args.empty()) {
        std::cout << std::endl;
    }

    // loop over `string` references of all `args`
    for (const auto &arg : args) {
        std::cout << "\t- " << arg << "\n";
    }

    // successful program exit
    return 0;
}
Run 1st Program Online
Here is a link for the above code to godbolt.org
Or run the code online with one of the platforms:
Run Program With Code IDE
Online you can't set arguments to call the executable, for this you can configure your Code IDE.
First find the CMake icon in the left menu sidebar and click on it to open the CMake sidebar.
In the middle is the Project Outline with your project name and the CMakeLists.txt.
If you have followed the instructions you can open the context menu on the Executable project and click Run in terminal.

The terminal should open below your code and some output of your program comparable to the above image should be viewable.
Now you have 2 possibilities to pass command line arguments to the program.
- CMake
- Code IDE
CMake Command Line Arguments
Edit the CMakeLists.txt and append:
add_custom_target(${MY_EXECUTABLE}-with-args
    COMMAND ${CMAKE_BINARY_DIR}/${MY_EXECUTABLE} first second third
    COMMAND ${CMAKE_BINARY_DIR}/${MY_EXECUTABLE} only-one
    COMMAND ${CMAKE_BINARY_DIR}/${MY_EXECUTABLE}
    DEPENDS ${MY_EXECUTABLE}
)
In your Project Outline you'll find now a new utility entry which is runnable in context menu and produces output for 3 program runs with arguments like specified.
Code IDE Run With Arguments
Create a subdirectory .vscode in your project directory.
Add the file launch.json with content:
{
    "version": "0.2.0",
    "configurations": [
        {
            "type": "lldb",
            "request": "launch",
            "name": "Run my-project",
            "program": "${workspaceFolder}/build/my-project",
            "args": [
                "one arg",
                "second arg"
            ],
            "cwd": "${workspaceFolder}/build"
        }
    ]
}
If your executable has a different name than
my-projectthen change the values!
Press Ctrl+Shift+D and the Run and Debug sidebar opens.
You can Run and Debug the Run my-project with the start button or F5.
Switch from Debug Output Tab to Terminal Tab and you see the program output:
Hello, from my-project!
The executable "my-project" has been called with 2 arguments.

    - one arg
    - second arg
The Terminal can be closed with Ctrl+D.
Happy C++ Coding
And check out the next blog post about my C++ Project Template providing good simplification and features for easy and safe C++ Development.
Some links for coding in C++:
- C++ Reference
- C++ documentation by DevDocs
- CppCoreGuidelines
- Awesome Modern C++ by Erik Rigtorp
- Awesome C++ by fffaraz